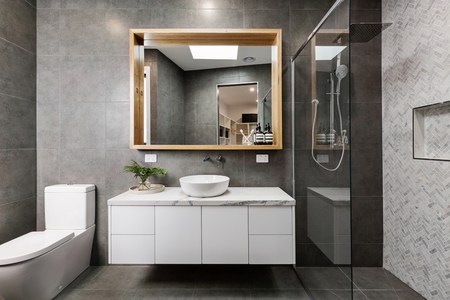
online poker

Sep-4-2019

Shaw Floors’ Waterproof Carpet

Posted by Carpets N More under Carpet

New carpet is a great way to transform your home; however, most homeowners are aware that life’s unexpected accidents are carpet’s enemy. When a beverage is spilled, or an animal urinates on your carpet, it soaks through and gets absorbed into the pad. This is how odors can be trapped in your home even after cleaning the carpet thoroughly because the origin of the smell is deep within the pad. Some companies provide Spillguard padding or water-resistant padding to help prevent this issue, but Shaw has gone a step further and has a solution to stop this issue at the source. Shaw’s Lifeguard Waterproof Carpets have an engineering backing the prevents the spills or messes from getting through the first layer and into the pad. This means the liquid is stopped at the source and not absorbed into your pad or subfloor to hold those dreaded odors.

Stress-Free Home 

How many times have you heard people, who have had new carpet installed in their living rooms, make the “new house rule” meaning no animals, no children, no beverages, no shoes, etc.? With Shaw’s Lifeguard Carpet, you can have a stress-free environment, knowing your new carpet is safe from spills and accidents. Transform your home into a more comfortable, inviting room for your family and friends, not with the underlying fear of messes. 

Spill-Proof 

The science of lifeguard’s spill-proof backing is not where this engineering stops. Shaw has incorporated in their R2X protection, which allows spills and stains to stay on the surface of the carpet longer than normal carpets. This means you have time before it will get to the waterproof backing. Shaw’s Lifeguard carpet has also been put through one of the most challenging waterproof tests. They installed Lifeguard Carpet at the bottom of a pool to withstand against 25,000 pounds of water. Shaw loves going above and beyond to let their customers rest assure that their bold claims are true. 

Why Wait?

All in all, Shaw’s Lifeguard Waterproof Carpet is one of the best carpets on the market today to stand strong against life’s unexpected accidents. It will keep your home smelling better and looking great for years to come. This high-performance carpet has revolutionized the industry, and with all the great patterns and designs, it can also revolutionize your home.

Aug-29-2019

Tips and Tricks for Creating a Gallery Wall

Posted by Carpets N More under Design and Decorating

Pictures are worth a thousand words. Plus, they are always a great focal point to have as a piece of artwork in a room. That being said, a gallery wall is made up of dozens of pictures in all different shapes and sizes. Hanging a single image can only depict so much; however, a gallery wall has to power to entirely create the room’s theme. This is a great addition to any bedroom or living room to help enhance the space’s design. If you are considering a gallery wall, here is everything you will need:

Photo Theme 

A gallery wall is a great way to create a theme in a room. If you were to add one picture of a log cabin, your theme might feel like it represents the painting. Yet, a gallery wall, on the other hand, could encompass the art of the mountainside, birds, and a sunset, all separately from your cabin picture. Now your one-sided theme is opened up to a much larger landscape. Decide what you would like your gallery wall to express. Maybe it is simply positive vibes or pictures with loved ones. Select all the pictures you are going to use and have them printed or purchased before you begin with the frames. 

Frames 

You have a lot of flexibility in your design. You can choose to have all your gallery wall just on canvases with no frames. You can also mix and match wall art to help add depth to your gallery wall. When it comes to hanging pictures you have had printed; however, you may want to consider matching frames. A great rule in art is creating harmony. Nothing will make your wall flow more homogenously than incorporating the same frame design. 

Layout 

Before you just start putting nails in your wall, calculate out your layout. Find an area on the ground and lay out the pictures exactly how you want them to be on the wall. You may want to consider the same spacing generally when adding pictures while incorporating landscape and vertical pictures to give your gallery wall more flavor. The layout is the most important part, so make sure you like how it looks. Also, consider where you will be hanging the pictures. While the layout may look fantastic on a 6×6 space on the ground, it may not translate well onto a wall that is 11×22 in dimensions. 

Creating a gallery wall is a great way to enhance your theme. Your gallery wall can still be the focal point of the room, yet it has the privilege to incorporate so much more than one image. What theme will you make your gallery wall? Let us know below in the comment section and for more great tips and tricks, make sure to subscribe!

Aug-27-2019

How to Spruce up Your Home’s Exterior

Posted by Carpets N More under Outdoor

Homeowners are spending more time outside of their homes. Long workdays and tedious travel commutes have us constantly living indoors. But our home is our place of refuge to unwind and escape the world’s daily demands. We love to indulge our time in the luxuries of the outdoors because it can feel like an escape. However, without an inviting landscape, you may not be facilitating your home’s exterior. Sprucing up your landscape can be super easy and a great hobby to keep you coming back outside. Here are three exterior upgrades that can make your exterior your very own private oasis:

Plants and Flowers 

Take advantage of the outdoors! Decide if you would like to start a garden by having beautiful flowerbeds, or just create some privacy with some trees and other plant life. Plants can easily add energy to your landscape. First, build flower beds to give more depth to your landscape then consider what you like in other landscape designs and create your own version. Plants and flowers will add color to your home, enhance your curb appeal, and have you continuously returning to the outdoors.

Running Water 

There are several ways to add running water outdoors. Plus, running water can give your landscape a more tranquil vibe. You can add fountains, a pond with a waterfall, or find other unique ways to add water to your landscape. We enjoy elements of nature more than just with our eyes. Give your ears a treat by adding running water to your home’s exterior.

Seating 

If you have a patio or a deck, you need to invest in some quality seating. Think of your interior. You could have the most gorgeous living room, but without proper seating, chances are, you probably will not hang out in there; therefore, you want to add different areas of seating. From tables, bars, relaxed patio seating, or even a fire pit, give your outdoors some options you can enjoy.

Your home encapsulates so much more than just the rooms inside of it. Do not neglect your home’s exterior since itis a great way to get the most of your home. Make your landscape your own by adding some of these tricks. With fall around the corner, this is the perfect season to spend time outdoors with your loved ones.

Aug-22-2019

How to Properly Remove Wallpaper

Posted by Carpets N More under Hints and Tips

Wallpaper is slowly coming back into style, but that does not mean you want your home’s old, worn-out wallpaper in your house still. Whether you are looking to add new wallpaper or simply repainting your wall, removing wallpaper can become a little challenging at times. Older wallpaper especially can become very challenging to remove from your walls. If you are looking to remove your wallpaper, there are several tricks of the trade to use. Here are the best ways to get down your old wallpaper in your home:

Step One: Prep

Wallpaper is a decorative wall product that is overlaid on top of the drywall. This can help enhance the aesthetics of the room without using paint, and the paper adheres with a one-sided stick adhesive, generally activated by water. To remove your wallpaper, first, start by clearing your walls of any pictures or décor. If your wallpaper was installed before the trim was placed up, you can remove the trim or simply score your paper with a cutting knife as close to the trim as possible. 

Step Two: Soak 

Next, put a tarp down on top of your floors to prevent water from splashing on your ground. Grab a bucket of warm water and add some vinegar. Apply with a sponge directly to the wallpaper. Allow the water to soak into the wallpaper to wet the backside. This can take a few coats and a little time. Give the water roughly 15-20 minutes to fully penetrate the paper. 

Step Three: Peal  

Start at a corner of the room or a seam. Pull back your wallpaper slowly. You may want to use a scaping device for harder areas. The longer wallpaper has been up, the hard it will be to remove. You can also fill a spray bottom with water and vinegar to loosen the surface. As you approach more challenging areas, spray the water directly behind the paper to help break down the bond. 

You may hit a more challenging spot than other areas in one room. Do not stress and be patient. Removing your wallpaper is the best way to prep your walls to be painted. For more tips and tricks on home improvement, make sure to subscribe

Aug-20-2019

Pet-Friendly Flooring Options

Posted by Carpets N More under Flooring

As homeowners, we love the blessings and joys pets bring to our households. Coming home to an energetic, loveable fur-ball is one of the best feelings in the world. However, as much as we love pets, they can have some destructive tendencies. Flooring can be an expensive home investment, and you want to get the most longevity out of it. So having a flooring that works well with your pet is ideal. Since each floor comes with its own sets of pros and cons, we are going to discuss the top pet-friendly floors for your home. Let’s take a look!

Tile 

A pet-friendly floor needs to be water-resistant and very durable.  Tile is a great-looking option that is very versatile in design. Plus, it adds a luxurious look to any home while being pet-friendly. Additionally, your pet’s paws will not damage tile flooring, making it the ideal solution for your furry friends. Also, with tile, accidents can be easily cleaned. However, tile and its grout are porous. Unattended areas may lead to staining, so remember to treat accidents as quickly as possible. 

Luxury Vinyl Planking 

While many homeowners love hardwood for its warmth, it is not always the best choice of flooring for pets.  LVP is a great hardwood alternative since these high-resolution floorings are 100% waterproof. They can give your home the appearance of wood or tile with added durability. Plus, they are also great to be installed in basements and wet areas of your home, and most LVPs can withstand pets’ claws from damaging them as well. 

Sheet Vinyl 

Sheet vinyl is another great choice. While not as durable, it comes at a fraction of the price. Additionally, it is a waterproof floor, which can withstand many pet accidents. Sheet vinyl has come a long way with a more comforting and padded feel! 

Finding a durable flooring that you will love in your home is key. Try to stay away from easily-damaged floors or flooring that cannot withstand your households daily wear and tear. Choosing the perfect floors can be challenging, but with Carpets N More, we take the difficulty out of selecting the right floors. Be sure to visit or call us for more information.

Aug-13-2019

Energy-Efficient Homes

Posted by Carpets N More under Hints and Tips

As we move forward in time, many homeowners and businesses are becoming more cognitive of finite resources. By making some energy-efficient adaptations, many people have been able to eliminate bills and find more energy-efficient solutions. Energy-efficient homes can increase the resell value of your home and helps against the negative impacts of greenhouse gases. If your home was no built as an energy-efficient home, have no fear. You can still make some simple home improvement tricks to help make your home eco-friendlier. Here are four tricks to explore today:

Smart Homes Thermostats 

Your first simple plan to integrate can be adding smart home features. Getting a smart thermostat can allow you to save on your energy bill. They also can lower or increase the temperature of your home while you are away and get it back into a comfortable temp zone when you arrive home.

LED Lighting 

Most lights create unwanted heat as well as waste an abundance of energy. Switching your home to LED lights can save you electricity. These lights will also last much longer than halogens or incandescent lighting. While saving on one light bulb may not be super-efficient, switching all of them can create a more notable difference in savings. 

Windows 

Regulating temperature in your home is done through your HVAC system. However, if you have poorly sealed windows, you can be losing a significant amount of heat. While new windows can be a substantial investment, it can save you significantly on lowering your energy bills each month. 

Washing and Drying Machines 

Consider switching to ENERGY STAR qualified washing and drying machines. These energy-efficient systems can use about half the energy. You can also save almost 3/4 of your normal water used during a wash cycle.  

Doing these simple tricks can help make your home for ecofriendly. If you are looking to be more conservative on the energy you are using in your home, consider these hacks. While some may be investments, they can help pay for themselves over time.


Aug-8-2019

Understanding Vinyl Plank Flooring 

Posted by Carpets N More under Flooring, Luxury vinyl tile

Luxury Vinyl Plank flooring has been storming the market for the past several years. Many homeowners and businesses have turned to this option of flooring for its superior durability and longevity. However, flooring investments may not be something you have done many times in your life. So why is LVP so incredible? Is it really worth the craze, and what should you look for in LVP? Not all vinyl planking flooring is created equal, but have no fear. We are here to help you identify some of the key attributes to look for in your LVP investments. Let’s take a look!

Wear Layer 

When shopping for LVP, you will quickly notice many products have different mil layers. The thickness of your planks does not necessarily represent the durability and quality. The mil layer is a top coating typically of clear urethane. This layer is there to help protect the vinyl layer beneath it from becoming damaged. Most wear layers can protect from stains, scratches, and UV damage. The thicker the mil layer, the better protection, and longevity you can expect out of the floor. The mil layer is simply represented by the thousandths of an inch. Most commercial applications are required to have a twenty mil layer. Mil layers can range from as low as six mils to forty mils. 

Water Proof 

Many manufacturers will market vinyl planking as waterproof. Waterproof is a very complex marketing term. The amount of water needed to penetrate a floor and pressure can all be used to determine a floorings water resistance. Typically, almost all LVP flooring systems are waterproof. They make great flooring options for rooms that will have wet areas.   Some companies will go as far to market their floorings as hurricane proof! Understanding the quality of your specific flooring can help you best determine its best application. That being said, most LVP will work in any wet environment. 

Underlayment 

Most LVP floors are floating, interlock flooring systems. You want to ensure when you are shopping that you are comparing apples to apples. Some of these floors will have a built-in underlayment, while others may not. The problem comes when you compare prices of a floor with the built-in underlayment versus one that must be purchased separately. Make sure you compare final prices to both floorings. 

When looking for the right LVP flooring, make sure to understand your flooring. Vinyl planking is an extremely versatile flooring, but not all LVP floors are created equal. Be sure to ask your Carpets N More sales representative for additional information. Thanks for reading!

Aug-6-2019

Back to School: Tips for Your Home

Posted by Carpets N More under Family Living

Summer is drawing to a close, and that means it is time to start your preparation for school. At first, you may think this does not affect your home. However, time schedules in your household are about to get stir up a little bit. Children will be out of the house sooner, more laundry from sporting events, and even more a chaotic schedule may come into the mix. There are a few rooms in our homes which need immediate attention before this all of this occurs, so make sure you prepare your home with these three simple tips.

Laundry Room 

With children going back to school, you may need to expect more laundry. Kid activities and sports may demand more clothing. You want to facilitate a plan to keep washing and cleaning clothes flowing at all times. This can be as simple as investing in laundry baskets and determining laundry days. Installing a “clean clothes” rack in your laundry room can allow clothes to dry and be put away at a more convenient time. You should arrange a game plan with your children to help this process be as smooth and effective as possible. 

Kitchen 

The kitchen also may get a little messier during the school year. Instead of having breakfast together, the mornings can be fast-paced before catching the bus or riding into school. You can establish an area for quick and easy snacks, set up a coffee station, and make sure everyone knows to put their dishes in the dishwasher before they leave. Just be sure to tailor the kitchen to your family’s lifestyle.   

Study Area   

A study area can also serve a great purpose during the school year. In today’s fast-paced society, there are more distractions than ever in the household. Designate a study area for your children and allow them a place to unwind and finish their assignments. Encourage your children to go to the study area right after school to help form strong habits. Make sure it is well-lit, no distractions, and provide areas where they can work, such as a desk or table. 

These simple tricks can help your household flow smoothly into the new school year. Help your children and family work together to keep your house clean and operating for the tasks ahead. For more tips and tricks, make sure to subscribe

Of course, you are in love with your tall walls and high ceilings. In fact, such depth makes your home feel more spacious, open, and it allows for the perfect opportunity to capitalize on natural lighting. While tall walls and high ceilings are a dream for many homeowners, it can be challenging to decorate spaces with such depth. In this article, we are going to discuss simple ways you can enhance your tall walls and ceilings so that you create a stunning design. Let’s take a look!

Darker Colors Add More Drama

In smaller spaces, darker colors can completely close off a room, making it appear smaller. However, with high ceilings and tall walls, dark colors will create an intimate and dramatic look. If you are apprehensive about painting your entire space a dark color, consider creating an accent wall using darker tones. It will help amplify the height without overwhelming the design.

Artwork Is a Must

When decorating tall walls, artwork is a must. The best way to complement your tall walls with artwork is to scale up their size. So you will want to choose large pieces that spread over the expansion of your walls. Horizontal art pieces will fill up the emptiness without being overpowering, whereas vertical artwork will also make a bold statement. Vertical art on your tall walls will draw your eyes upwards. You can stick to a single, bold piece of art, or you can venture out and create a gallery. If you are interested in creating a gallery or a grouping of art pieces, be sure to mix up the sizes for a unique look.

Dabble in Textiles

For a super modern look, consider dressing your tall walls in textiles. Find the right swath of fabric that goes with the theme of the room. For example, you can use wooden rods to mount the swath of fabric on the wall. Depending on the scale of the wall, you can install multiple swaths of fabrics.

How do you currently dress up your tall walls and ceilings? Do you already use any of the tips we mentioned? We would love to hear your feedback below in the comment section. Thanks for reading!

Tags:
Jul-29-2019

DIY Guide for Installing Carpet | Part Four

Posted by Carpets N More under Carpet, Installation

Homeowners will need to understand that almost all medium to larger rooms will have a seam. Standard carpets come twelve-foot-wide sizes, so some seams are inevitable. Seaming is a task that takes a keen eye and extreme level of scrutinizing. No seam will be invisible, but creating the perfect seam should make it very hard to see in a glance. Today, we are going to focus on seaming and how it do it yourself. Let’s take a look!

Seaming

If your space is over twelve feet wide, you will need to create a seam on your carpet.  First, measure your room and make your excess cuts.  You will most likely be having cross seams as well to complete your room.  Your carpet must all lay the same direction, so pay attention to how you unroll it before cutting!  Use your row finder to run a row down the carpet with-the-grain.  Using your top cutter blade, cut along your row on both pieces of carpet to create a perfectly straight edge.  Your top cutter can put the blade closer or further from the carpet, so make sure you put the correct distance before cutting.   Create your rowed cuts.  

For your cross seams, you should flip your carpet over and cut from the back.  Using the cut edge, you just created, use your right angle and straight edge to make a perfect 90-degree cut.  Repeat this process for all your cross-seams.  

Once you have made all your seam cuts, roll your seam tape out underneath all the areas you will be seaming.  Your seam tape may have a line down the middle to help keep you perfectly aligned.  Allow this line to run directly down your seam.  Plug in your seam iron into your extension cord and allow it to heat up for seaming.   Pull back your seam and put your iron directly on seam tape and let it heat. Start with all your cross seams and then move into your big seam. Have your carpet kicker nearby with the teeth out and ready to use.  

As you heat your seam tape move down the carpet and meticulously line your carpet’s backing up to begin seaming.  Keep your carpet’s fibers away from the hot seam tape as you go.  Using your carpet tracker and seam weight, follow behind yourself and track the seam and apply weight – this must be a strict procedure, or it will show in the finished product!  If your carpet shifts, use your kicker to move it back in place, carefully!

Seaming carpet takes practice and can be challenging, depending on the design of each carpet. Patterns, textures, backing, and even pile loop can play a significant role in how visible a seam will be. If you missed the rest of our series, be sure to check them out here.

Tags: